Home/SVG design library/SVG box templates: free nets and a size generator/Tuck-top box with tongue and closure slit SVG: free cut file

Tuck-top box with tongue and closure slit SVG

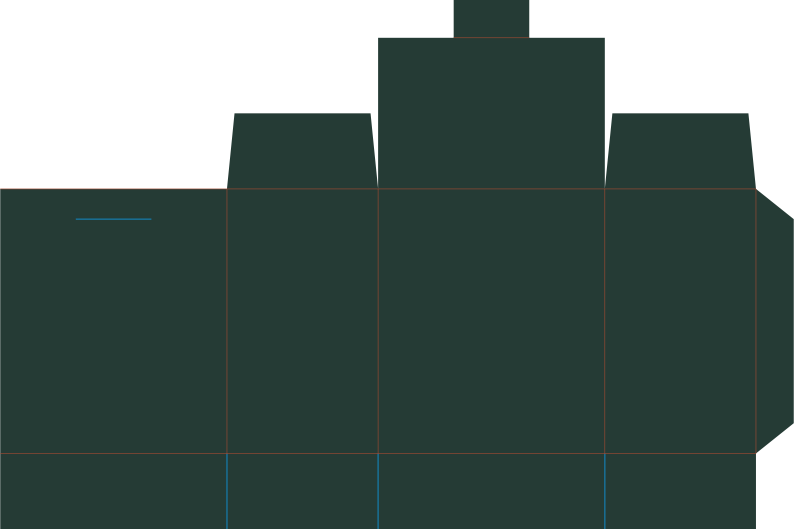
Tuck-top box with tongue and closure slit. Four body panels form a 60 × 40 × 70 mm box. The back lid crosses the 40 mm depth; its 20 mm tongue enters the front slit. Fold the lid tongue, join the side seam and glue the bottom flaps. Slit and tongue are nominal drawing dimensions; adjust their clearance for your material. File canvas 210 × 140 mm (8.27 × 5.51 in). Download the original SVG without an account.

Tuck-top box with tongue and closure slit SVG pieces

Free SVG · No account needed

60 × 70 × 40 mm (2.36 × 2.76 × 1.57 in) nominal finished size

Four body panels form a 60 × 40 × 70 mm box. The back lid crosses the 40 mm depth; its 20 mm tongue enters the front slit. Fold the lid tongue, join the side seam and glue the bottom flaps. Slit and tongue are nominal drawing dimensions; adjust their clearance for your material.

File canvas
210 × 140 mm (8.27 × 5.51 in)
Artwork bounds
210 × 140 mm (8.27 × 5.51 in)
Vector elements
2
Named groups
3
Download Tuck-top box with tongue and closure slit SVG ↓

Other formats are created in your browser. DXF approximates curves; PDF keeps the physical canvas size. Dashed fold guides become solid lines in these copies; assign them to Score before cutting.

Personal projects and finished items for sale are included.

Fit this finished layout to your blank →

What is in the SVG

Blue lines in the cut slits group are cuts through the sheet. Red score guides are folds. Assign these groups separately before cutting.

cut outlines; cut slits; score guides. The preview shows the supplied vector shapes. It is not a photograph of a finished project.

Four body panels form a 60 × 40 × 70 mm box. The back lid crosses the 40 mm depth; its 20 mm tongue enters the front slit. Fold the lid tongue, join the side seam and glue the bottom flaps. Slit and tongue are nominal drawing dimensions; adjust their clearance for your material.

  1. Keep the cut outline and score guide groups separate.
  2. Assign guides to score or mark them separately; colour alone does not set an operation.
  3. Fold the panels at their guides and check the closure before joining the final seam.

Use Resize SVG to change the canvas dimensions, or inspect the file before choosing cut and score operations.

Download the full box and tray svg templates when you need the matching designs.
Related designs

Cube favour glue-flap box vector outline

Cube favour glue-flap box

45 × 45 mm (1.77 × 1.77 in) finished layout

Four side panels with top and bottom glue flaps. Join the side tab, fold the short dust flaps inward, then glue the two full-depth rectangular flaps together at each end. Each major flap covers the opening exactly. Nominal dimensions exclude material thickness; this is not a locking tuck.

See the file and download →
Tall favour glue-flap box vector outline

Tall favour glue-flap box

35 × 80 mm (1.38 × 3.15 in) finished layout

Four side panels with top and bottom glue flaps. Join the side tab, fold the short dust flaps inward, then glue the two full-depth rectangular flaps together at each end. Each major flap covers the opening exactly. Nominal dimensions exclude material thickness; this is not a locking tuck.

See the file and download →
Tea sachet glue-flap box vector outline

Tea sachet glue-flap box

65 × 85 mm (2.56 × 3.35 in) finished layout

Four side panels with top and bottom glue flaps. Join the side tab, fold the short dust flaps inward, then glue the two full-depth rectangular flaps together at each end. Each major flap covers the opening exactly. Nominal dimensions exclude material thickness; this is not a locking tuck.

See the file and download →

Want another format? Convert the SVG to DXF or make a PNG preview. The conversion runs locally.